
So you want to deploy smart contracts on Hedera. Perhaps you’ve been working with Ethereum, and you’re curious about what Hedera offers. Or maybe you’re starting fresh and chose Hedera for its lower fees and faster finality. Either way, you’re in the right place.
In this guide, you'll find out how to set up your development environment and create a smart contract project. We'll also cover how to deploy it to Hedera Testnet, find your deployed contract in HashScan, verify your smart contract source code, and much more.
How Smart Contract Deployment on Hedera Works
Here’s how to deploy a smart contract on Hedera:
- Write the source code.
- Compile it to bytecode.
- Send the bytecode to Hedera using tooling compatible with the Ethereum Virtual Machine (EVM) or Hedera SDKs.
- Create a contract on the network.
- Get back the contract ID or address you can use to interact with it.
When you deploy smart contracts on Hedera, the process won't feel unfamiliar — Hedera supports Solidity and standard EVM tools through the Hedera Smart Contract Service, which provides an EVM-compatible execution environment. You can also check out our Hedera guide if you're new to the network.
What Makes Hedera Smart Contracts Different?
Here are some of the main aspects that make Hedera different:
- Native service integration. Hedera smart contracts can use built-in Hedera services, such as the Hedera Token Service (HTS), directly from Solidity — something that typically requires separate contract infrastructure on other EVM networks.
- Fast finality. Transactions on Hedera become final in just a few seconds, usually between three and five seconds.
- Comparatively low and predictable fees. Fees are USD-denominated and paid in HBAR, announced in advance, and don't fluctuate with network load.
Here's a quick comparison of deploying on Hedera versus the Ethereum network:
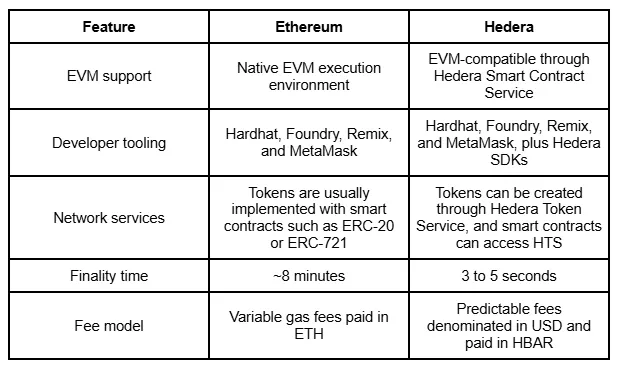
Smart Contract ID vs. Contract Address
A Hedera contract ID is the native Hedera identifier for a smart contract. It looks like 0.0.x, for example 0.0.123456. When deploying through Hedera-native tooling, you can receive and use this identifier.
An EVM-compatible address is the Ethereum-style address for the same contract. It looks like a 0x address, for example, 0xabc...123. If you deploy through Hardhat, you’ll typically work with this format.

Where Hedera Token Service Fits In
Hedera smart contracts can interact with built-in network services, and HTS is one of them. With HTS, you don’t always need to deploy a full ERC-20 from scratch just to create a token, as is commonly done on Ethereum.
You can just create a native Hedera token through HTS without writing a single line of Solidity for the token itself.
Prerequisites Before You Deploy Your Smart Contract
Before contract creation and deployment, make sure you have the tools needed to build, submit, and verify it, as well as the testnet resources to try the process safely first:
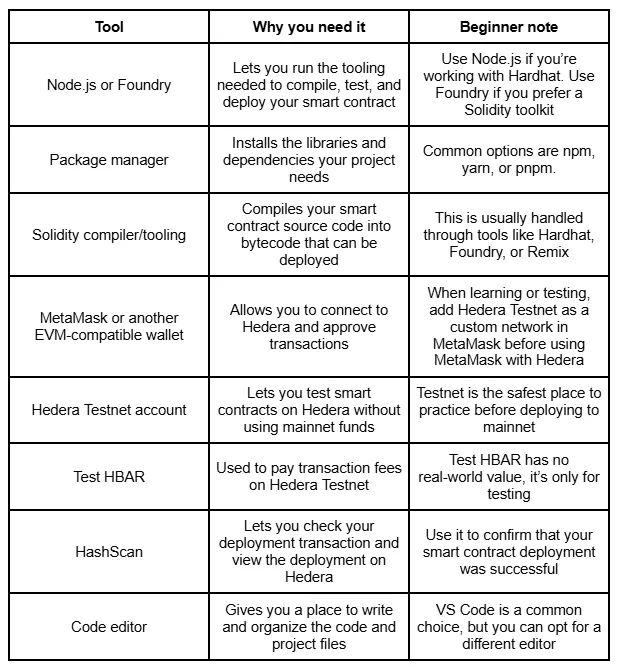
Once you have everything in place, you're ready to set up the project.
Create and Fund a Hedera Testnet Account
To use Hedera Testnet, you’ll need a testnet account, a way to manage it, and test HBAR to pay for testnet transactions.
- The Hedera Developer Portal. After creating a developer profile, you can create a Hedera Testnet account and receive test HBAR to deploy and test smart contracts.
- The Hedera Faucet. If you use MetaMask or another EVM-compatible wallet, you can enter your public wallet address. The faucet creates a linked Hedera testnet account and funds it with test HBAR.
- HashPack. It’s a Hedera-native wallet with a visual interface for managing testnet assets, viewing balances, and tracking transactions.
Important: While following tutorials or testing deployments, never use the private key of a wallet that controls real mainnet funds.
Set Up Your Development Environment
A development environment is the local setup you use to write, test, and deploy code — in this case, everything needed to get a smart contract onto Hedera Testnet.
You’ll usually need to set up the following:
- Project directory: the folder that contains your Solidity files, scripts, and configuration.
- Dependencies: the tools and packages your project uses to compile, test, or deploy.
- Environment variables: values your project needs but that you usually keep outside the main code, such as a test wallet key.
- RPC URL: the endpoint your tools use to connect to Hedera Testnet.
- Chain ID: the identifier your tools need to recognize the correct Hedera network.
Step 1: Create a New Smart Contract Project
Here, we use Hardhat 3 with Ethers to deploy to Hedera Testnet. Open your terminal and run:

When Hardhat asks what to create, choose the TypeScript Hardhat project with Mocha and Ethers.js if prompted, and accept the default options.
Your project will include several key folders and files:
- contracts/ - where your Solidity smart contract files go
- scripts/ - where deployment scripts go
- test/ - where test files go
- hardhat.config.ts - where compiler and network settings are configured
- package.json - where project dependencies and commands are tracked
At this point, you’ve created the project structure and installed the main dependencies. Next, you’ll add the code.
Step 2: Write a Simple Solidity Smart Contract
The next part is contract creation.
In the contracts/ folder, create a file called MessageStore.sol and add the following:
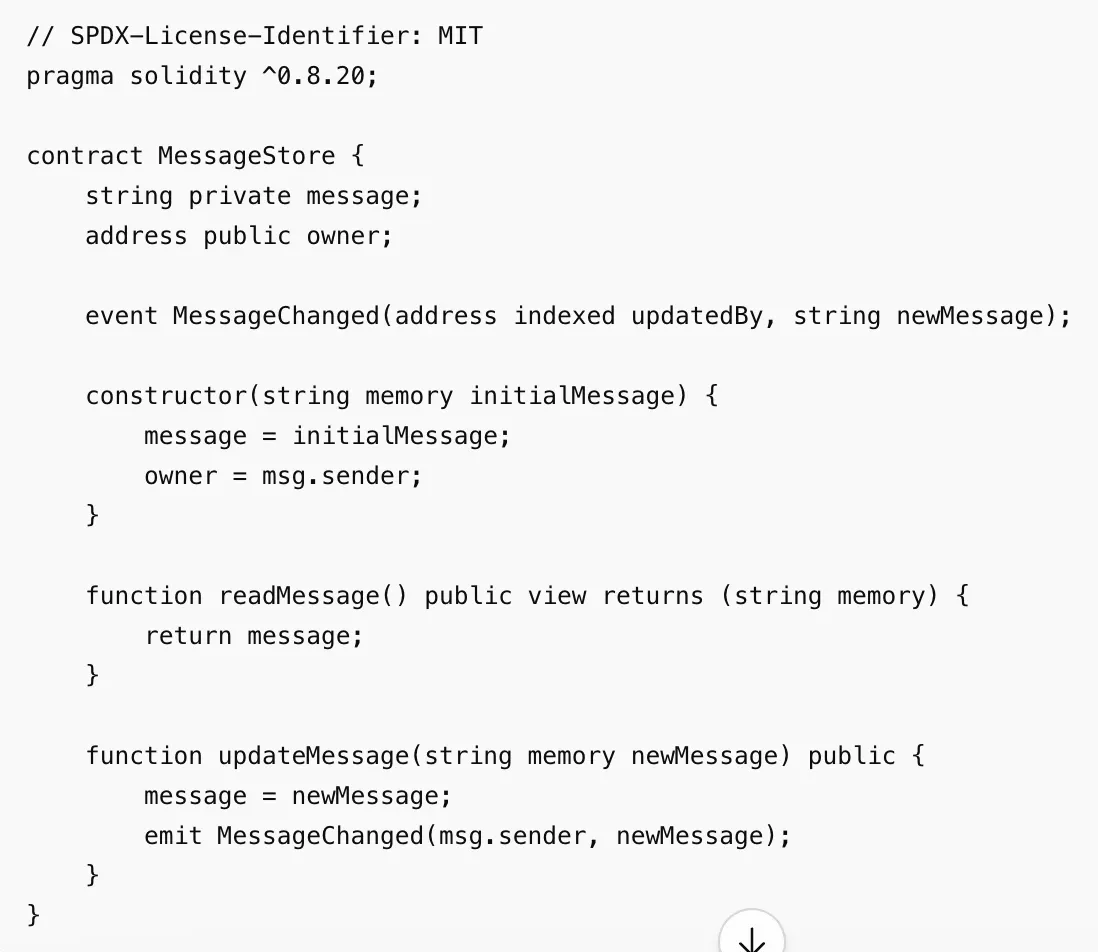
This contract is a small message storage example. It saves one message on-chain, lets anyone read it, and lets users update it. Here’s what’s happening inside:
- State variables store data on-chain. Here, message stores the current message, and owner stores the address that deployed the contract.
- The constructor runs once during smart contract deployment. Here, it sets the first message and records the deployer as the owner.
- The read function readMessage() returns the current message. Because it only reads data and doesn’t modify state, it doesn’t create a state-changing transaction.
- The write function updateMessage() changes the stored message. Since it updates on-chain state, calling it requires a transaction.
- The event MessageChanged creates a log whenever the message is updated, which makes changes easier to track later.
Important: This example is intentionally simple. Don't use it as a base for any logic that handles real funds or financial operations without a full audit first.
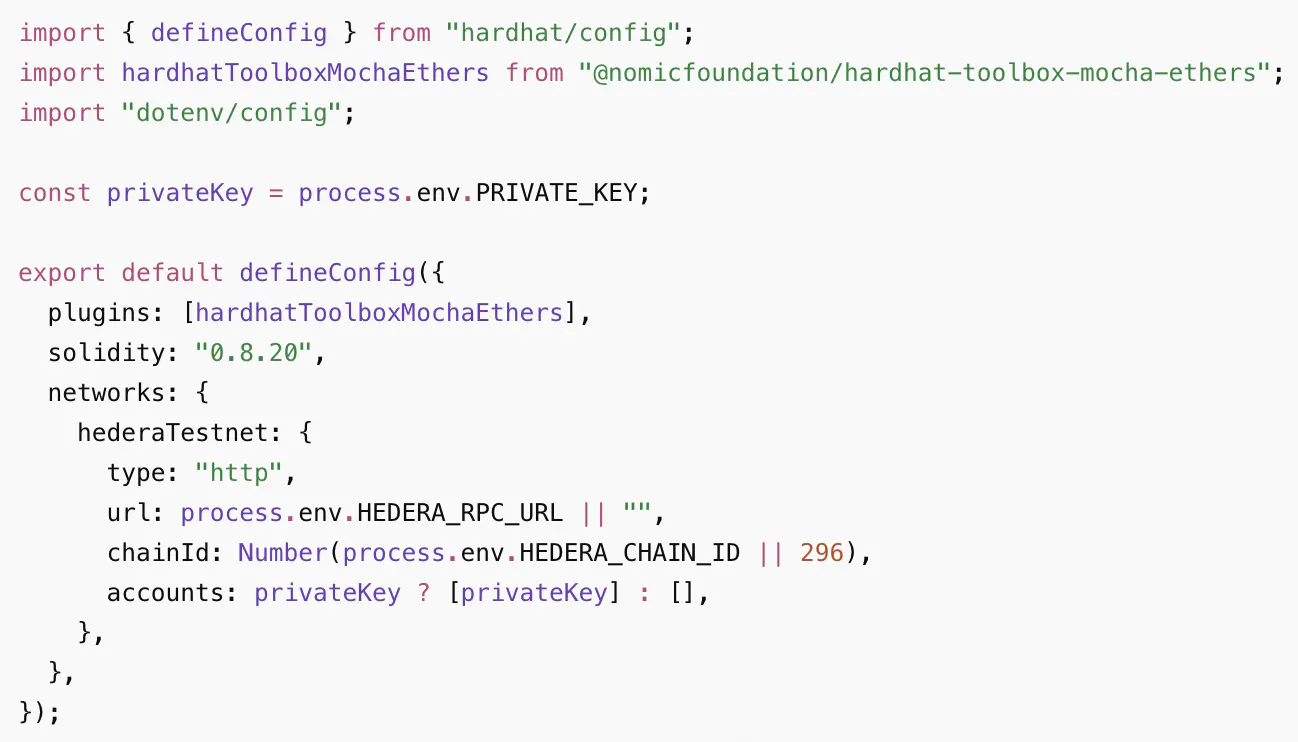
Step 3: Configure Hedera Testnet RPC and Private Key
Now the project needs to know where to send transactions and which account should sign them. Create a .env file in the root of your project with the following values:
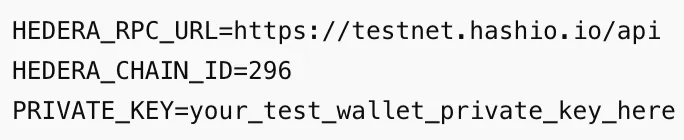
Here’s what each value means:
- HEDERA_RPC_URL is the endpoint your project uses to connect to Hedera Testnet.
- HEDERA_CHAIN_ID identifies the Hedera Testnet network.
- PRIVATE_KEY is the test wallet key used to sign deployment transactions.
Important: When practicing, use a separate wallet with test HBAR only. On mainnet, never hardcode or commit a private key. Use a secure wallet or your project's approved key management approach instead.
Before going further, add .env to your .gitignore file so it is never committed to version control.
Next, update hardhat.config.ts so Hardhat knows how to connect to Hedera Testnet:
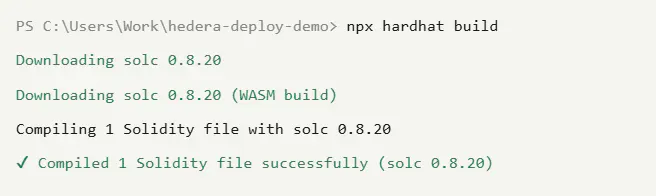
Step 4: Compile and Test the Contract
Before deploying, the contract needs to be compiled. Compilation turns your Solidity source code into two outputs:
- Bytecode - the low-level code that gets deployed to the network
- ABI - the interface that apps and scripts use to interact with the contract after deployment
From your project folder, run:
npx hardhat build
If the build succeeds, Hardhat should finish without errors and generate the compiled artifacts. These artifacts include the bytecode and ABI that will be used later when the contract is deployed and called.
Once the contract builds cleanly, you’re ready to deploy. But you can also write local tests to check that the initial message is stored correctly and that updateMessage() works as expected.
Step 5: Deploy Smart Contracts to Hedera Testnet
Now comes the main step: using Hardhat to deploy smart contracts to Hedera Testnet.
In the scripts/ folder, create a file called deploy.ts:
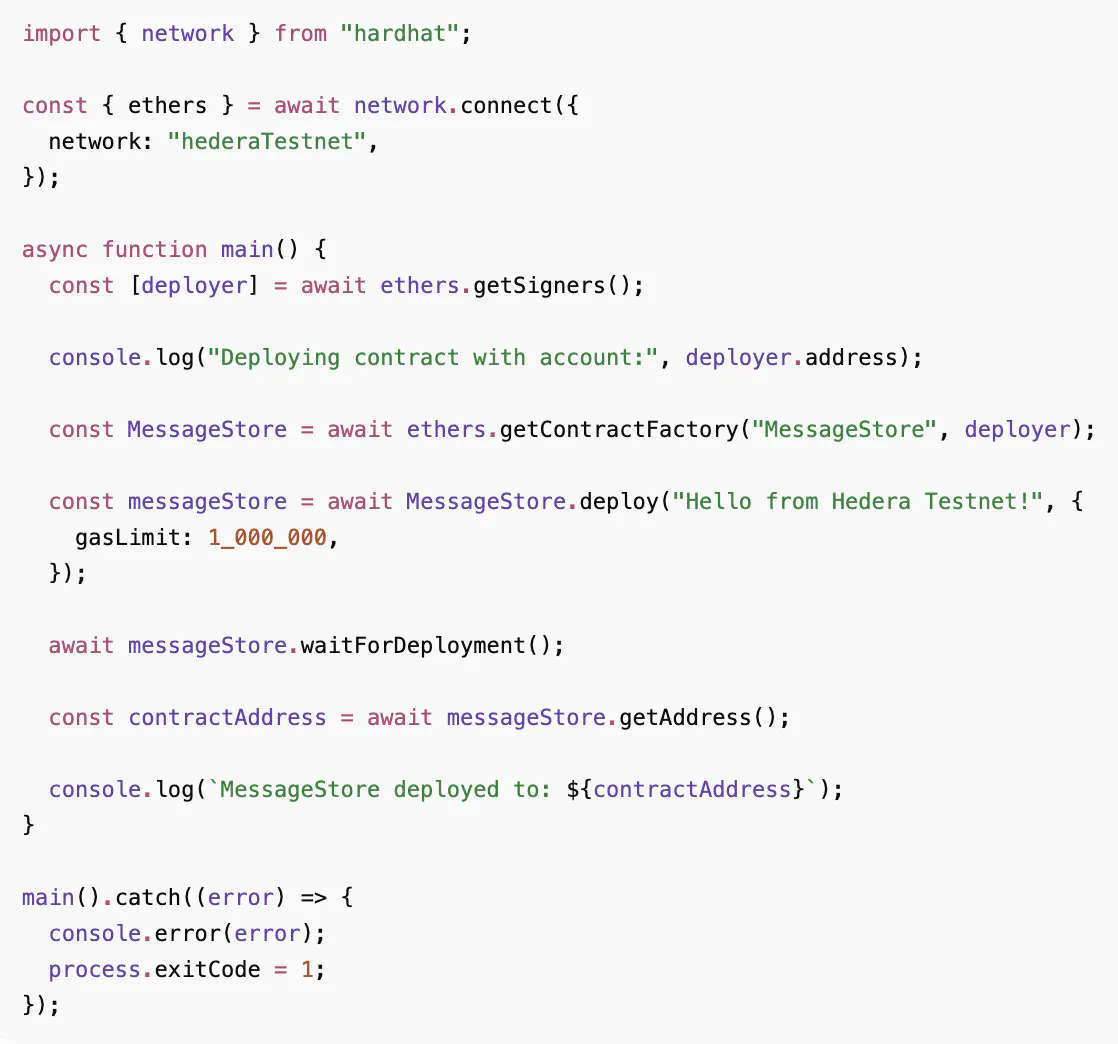
This script loads the MessageStore, passes the first message into the constructor, submits the deployment transaction, and prints the deployed location.
The gasLimit sets a cap on how much the deployment transaction can cost. If the actual cost is lower, you only pay for what was used.
Next, from your project folder, run:
npx hardhat run scripts/deploy.ts --network hederaTestnet
This command sends the deployment transaction to Hedera Testnet through the RPC URL added earlier. The private key from your .env file signs the transaction, and the fee is paid in test HBAR.
If the smart contract deployment succeeds, the terminal should show output similar to this:

It may take a short time for the new contract to appear in HashScan. A small delay doesn’t always mean the smart contract deployment failed; the explorer may just still be indexing the transaction.
Step 6: Find the Contract Address and Smart Contract ID in HashScan
Once contract deployment is done, the terminal will print the deployed location. Open HashScan Testnet, paste it into the search bar, and note down the following details:
- Address - the EVM-style 0x... address used by Ethereum-style tools.
- Smart contract ID - the Hedera-native ID, usually shown in the 0.0.x format.
- Deployer account - the account that submitted the deployment transaction.
- Transaction hash - the unique identifier for the deployment transaction.
- Timestamp - the time when the deployment was recorded.
To see how it works, check out the SaucerSwap contract deployments page.
Step 7: Make Contract Calls After Deployment
At this stage, you can start interacting with your deployment. Calls usually fall into two groups:
- A read call only looks up data. It doesn't change anything on-chain.
- A write call changes the stored data.
You could create a simple script called interact.ts in the scripts/ folder:
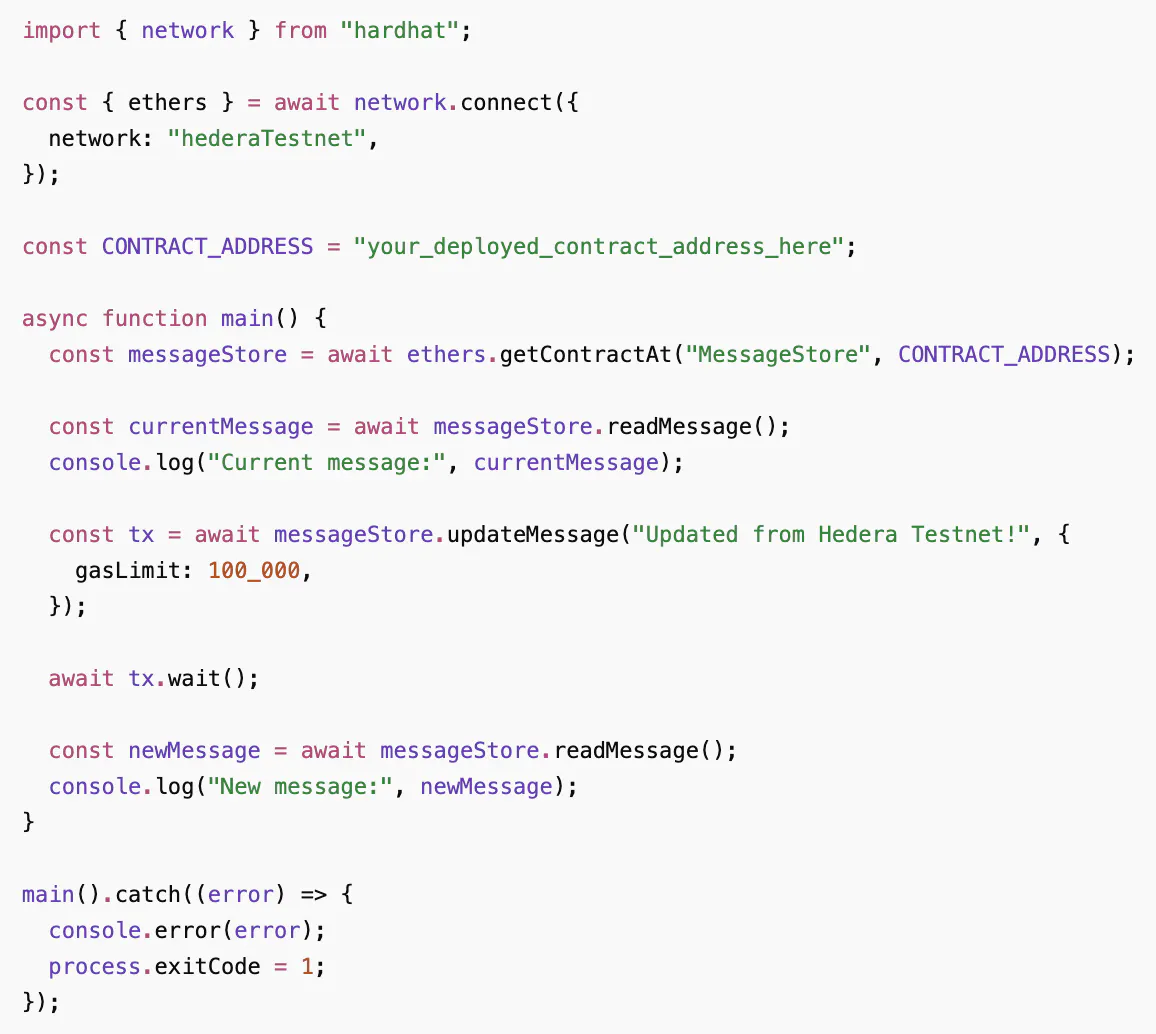
Here, the first readMessage() call queries the current state. The updateMessage() call submits a transaction that changes the message. The final readMessage() call checks the updated value after the transaction is complete.
The gasLimit is included on the state-changing call because write operations require network execution. Read calls usually don't need a gas limit because they only query on-chain state.
Next, from your project folder, run:
npx hardhat run scripts/interact.ts --network hederaTestnet
If everything works, the terminal should show the original message first, then the updated message after the write transaction is confirmed.
Step 8: Verify Your Smart Contract Source Code
After smart contract deployment, Hedera stores your code as bytecode on the network. Verification connects this bytecode back to the human-readable Solidity source, so others can see exactly what was deployed.
This is essential since verified code is simpler to examine and trust. Users, developers, wallets, and explorers can all gain a clearer understanding of what was actually deployed.
On Hedera, verification is available via Sourcify. Once complete, HashScan can mark the deployment as verified and show its source code on the page.
There are two common verification results:
- Exact match. The compiled source code fully matches the deployed bytecode.
- Partial match. The main logic matches, but some extra details are different, such as compiler settings or file paths.
To verify manually, open the deployment page on HashScan Testnet, navigate to the Contract tab, and upload your source files and compiler settings. HashScan will match them against the deployed bytecode and mark it as verified if they align.
Optional Path: Hedera SDK ContractCreateFlow
The Hardhat flow mentioned earlier is a typical path for Ethereum developers. But Hedera also has its own SDK-based option: ContractCreateFlow. Unlike Hardhat, it gives you access to Hedera native properties such as admin keys, memo fields, and auto-renew settings.
ContractCreateFlow takes the compiled bytecode and runs the main steps needed to deploy on Hedera. It creates a file to store the bytecode, deploys from it, and then deletes the temporary file. The result includes a new contract ID, and you can set Hedera native properties during this process.
For steps on creating a smart contract with ContractCreateFlow, you can refer to Hedera’s official documentation.
How System Contracts Can Extend Your App
After deploying a basic contract, you may also want your app to perform tasks beyond just storing or updating data. System contracts help with that on Hedera.
They let Solidity smart contracts interact with Hedera-native services, such as HTS. You don’t need this yet for a contract like MessageStore.
This is mainly beneficial for token-based apps. For example, a DeFi app might use them to transfer HTS tokens or manage token permissions directly from a Solidity contract. To see how a real decentralized exchange implements this on Hedera, the SaucerSwap V1 AMM is a good reference.
Security and Mainnet Readiness Checklist
Testnet allows mistakes. Mainnet doesn’t. Before deploying to mainnet, go through this checklist:
- Core functions are covered by tests, including edge cases and failed transactions.
- Admin-only functions, owner permissions, and role-based actions are protected.
- Private keys aren't hardcoded, committed to Git, or stored in shared files.
- Important actions emit events, making contract activity easier to track.
- Source code is verified so users and developers can inspect it.
- Deployment and call costs have been reviewed before submission.
- Another developer or security reviewer has checked the logic.
- Contracts handling tokens or user funds have gone through professional protocol audits. This is especially important for complex financial instruments like lending protocols and liquidity pools.
- A bug bounty program is in place to encourage responsible disclosure after launch.
- There is a plan for what happens if something needs to be paused, replaced, or migrated.
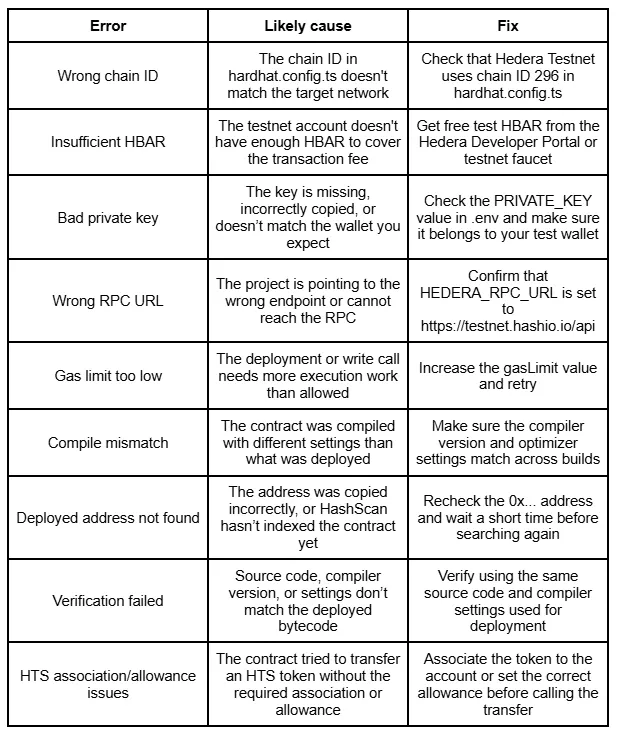
Troubleshooting Hedera Contract Deployment Errors
If you encounter an error during deployment, here are some of the most common ones, their likely causes, and where to start when fixing them:
What to Build Next on Hedera
You’ve deployed, interacted with, and verified a contract. What next?
- Counter or message app. A natural next step after deploying your first contract. You could expand MessageStore into a small app with a frontend that reads and updates contract state.
- Token-gated feature. Build a page or action that only becomes available when a user holds a specific token.
- HTS token transfer demo. Write smart contracts that transfer HTS tokens directly.
- NFT minting project. Even a small NFT collection covers a lot of ground: token creation, metadata, and wallet interactions all in one project.
- Simple DeFi dashboard. A dashboard that displays token balances, pool data, or transaction activity is a good way to practice reading on-chain data and connecting it to a frontend.
Each of these builds on what you've already set up — the same project structure, the same testnet account, and the same deployment flow.
FAQ
Can I use Solidity on Hedera?
Yes. Hedera supports Solidity through the Hedera Smart Contract Service, so you can write, compile, and deploy contracts using Hardhat, Foundry, or Remix — the same tools you'd use on Ethereum.
How do I deploy a smart contract on Hedera?
Write a Solidity contract, compile it, and submit the deployment transaction using Hardhat. Make sure your account has HBAR to cover the fee, and point your config to the Hedera Testnet RPC before you start.
Do I need HBAR to deploy smart contracts on Hedera?
Yes. Every transaction requires HBAR to cover network fees. On testnet, you can get free test HBAR through the Hedera Developer Portal or the testnet faucet. On mainnet, fees are predictable but never zero.
What gas limit should I use for contract deployment?
A gasLimit of 1,000,000 is a reasonable starting point for deploying a simple contract. For write calls, 100,000 is often enough. If a transaction fails with an out-of-gas error, increase the value and retry.
Should I verify my Hedera smart contract?
Yes. Verification links the deployed bytecode to your source code, so anyone can confirm what the contract does. Verified contracts show a verification mark in HashScan.
Should I deploy directly to mainnet?
No — always test on Hedera Testnet first. It mirrors mainnet functionality but uses free test HBAR, so you can confirm everything works before risking real funds.
Conclusion
You've gone from an empty folder to a deployed, verified smart contract on Hedera Testnet. The workflow — write, compile, deploy, verify — stays the same as you build more complex contracts. Important reminder: always test on Hedera Testnet before moving to mainnet.
When you're ready to take it further, SaucerSwap shows what production-grade DeFi contracts look like on Hedera — from deployment to audit.


